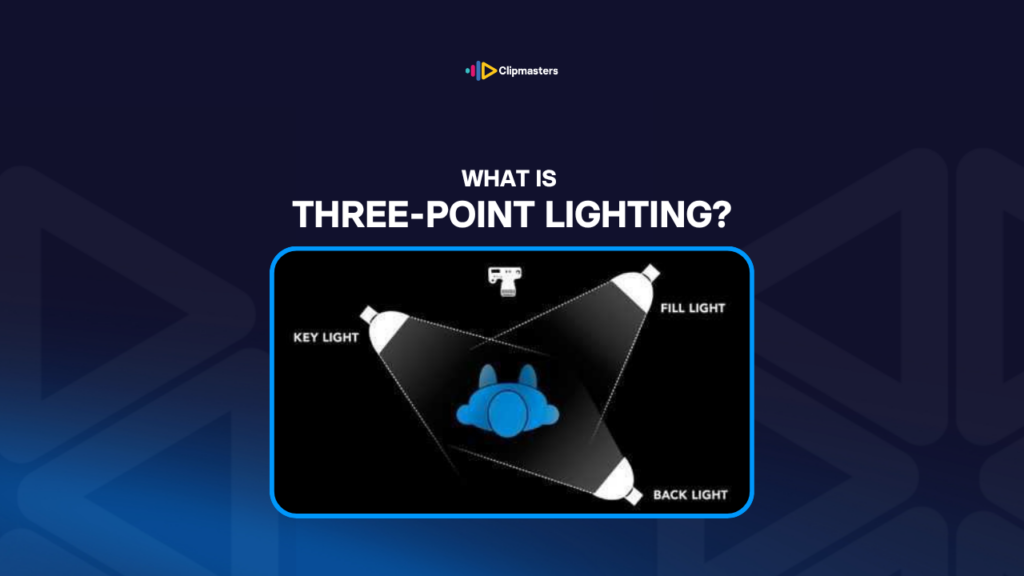
Three-point lighting is the foundational lighting setup for most professional video and photography. It uses three lights, each with its own job, placed around the subject to create a controlled, three-dimensional image.
The three lights:
Together, these three lights hit the subject from three directions. The result is dimensional rather than flat, controlled rather than harsh, and it reads as “professional” to most viewers.
Common variations:
Three-point lighting is the default for talking heads, interviews, product shots, and most controlled-setting video. Once you have it down, it is the starting point for lighting almost any scene.
Here are the specific reasons three-point lighting is the industry standard.
It creates dimension. A single light makes a flat image, because all the shadows fall the same way. Three lights from different angles create the feeling of three-dimensional space.
It controls contrast. The balance between key and fill brightness sets how moody or even the image feels. You can dial in exactly the contrast you want.
It separates the subject from the background. The back light is the quiet hero here. Without it, a subject can blend into a similar-toned background. With it, the subject pops forward.
It reads as professional. Decades of film and TV have trained what audiences expect. Three-point lighting matches what people think “good” video should look like.
It is predictable and repeatable. Once the setup is dialed in, you can repeat it for consistent results. That matters for multi-episode content, interview series, and brand work that needs to look the same every time.
It plays well with editing software. Footage shot with three-point lighting colour-grades and composites more predictably than footage shot under messy available light. The editor’s downstream work gets easier.
It is forgiving of small movement. Subjects who shift a little during a shoot stay lit, because the multi-light setup covers a reasonable range of position.
For commercial production, three-point lighting, or a variation of it, is the default for any controlled setup: interviews, product shots, testimonials, talking heads, executive videos, training content. Across the industry, this is how indoor commercial video is expected to be lit.
For documentary and run-and-gun work, three-point lighting is often impractical because of time and space. In those cases, single-light or available-light setups become the workaround. But three-point stays the reference standard.
Here is the practical workflow for building a three-point setup.
Position the subject. Place the subject where they will be filmed. Think about the background, the camera angle, and any movement they will do during the shoot.
Place the key light. Start with the key at a 30 to 45 degree angle from the subject’s face, slightly above eye level. Aim it at the side of the face that should be brightest. Adjust the intensity until the exposure looks right for the camera.
Place the fill light. On the opposite side from the key, at a similar height. Set the fill less bright than the key, often half as bright or less, depending on the contrast you want. The fill softens the shadows without wiping them out completely.
Place the back light. Behind the subject, aimed at the back of the head and shoulders. Position it so the light itself is not visible to the camera. Adjust the intensity so the rim of light shows up without taking over.
Check the overall look. Step behind the camera and take it in. Is the contrast right? Does the subject feel three-dimensional? Is the back light visible without being distracting? Are there unwanted shadows on the background?
Adjust as needed. Lighting takes a few passes. Move lights, change intensities, add diffusion, block off spill. The first pass is rarely the final setup.
Look at the background. If the background feels flat or busy, add a background light or a fourth source. Sometimes just moving the subject fixes it.
Set white balance correctly. All three lights should be the same colour temperature, unless you are mixing them on purpose for an effect. Mixed temperatures create unpredictable colour casts.
Lock everything down. Once the lighting is dialed in, mark the positions. If anything moves during the shoot, put it back where it was.
For most professional shoots, lighting a controlled interview takes 30 to 60 minutes, and longer for complex multi-subject scenes. The time you put into proper lighting pays off in editing, colour grading, and the final image.
Here are the patterns that mark lighting as amateur.
No back light. The most common mistake. Without separation, the subject looks stuck to the background. The image feels flat.
Too much fill. Wiping out all the shadows makes a flat, characterless image. Some shadow is what creates dimension.
Too little fill. Hard shadows on one side of the face look harsh and unflattering for most subjects. A bit of fill is almost always needed.
Key light too straight on. A key placed directly in front of the subject, at the camera position, makes flat lighting, a lot like a bad smartphone photo. A side angle creates dimension.
Mixed colour temperatures. Daylight from a window mixing with warm tungsten lights mixing with cool LED panels makes a messy colour cast that is hard to fix in grading.
Visible light gear. Stands, modifiers, or the lights themselves showing up in frame. Easy to miss during setup, awkward in the final cut.
Reflections in glasses. Subjects wearing glasses can reflect the key or back light right back. Tweak the angles a little until the reflections go away.
Harsh shadows on the background. Lighting that throws hard subject shadows onto the background usually looks amateur. Pull the subject away from the background, or use softer light.
Lighting that does not match between angles. In multi-camera setups, the lighting needs to work for every angle. Lighting that looks great on the A-camera but rough on the B-camera creates editing problems.
Inconsistent setups between sessions. For an ongoing series, lighting that changes session to session creates a mismatched look. Document your setups with photos, diagrams, or measurements so you can repeat them.
Ignoring practicals. Lights inside the scene, like lamps, computer screens, and neon signs, need to fit into the lighting plan. Practicals that are too bright or too dim next to the three-point setup look unrealistic.
For commercial work, lighting is often the biggest visible difference between polished and amateur video. The camera and editor can be excellent, but bad lighting will undercut the result. The reverse is true too: good lighting can make modest gear and modest editing produce strong results.
Three-point lighting happens on the shoot, not in the edit, but it shapes everything the editor can do with the footage. Well-lit footage is faster to colour grade, easier to composite, and looks more polished no matter how good the editing is. A good editor will flag when incoming footage is not lit well, since flat lighting can sometimes be partly rescued in the grade, but a missing back light usually cannot be added later. At Clipmasters, your editor will tell you honestly what the footage allows.
Ideally yes, but you can approximate it with fewer sources. A single light plus a reflector creates a key-fill relationship. Window light plus a fill panel works in some situations. Three dedicated lights give you the most control, but a two-light setup, like a key plus a back light, can produce surprisingly professional looks on a budget.
Hard lighting comes from small sources, like a bare bulb or a focused LED, and produces sharp shadows. Soft lighting comes from large, diffused sources, like softboxes, umbrellas, or bounced light, and produces gentle shadows. Most commercial and interview work uses soft lighting because it is more flattering. Hard lighting is used for dramatic or stylised content.
Common ratios are 2:1, 3:1, or 4:1, meaning the key is brighter than the fill by that factor. 2:1 produces gentle, even lighting common for commercials and corporate video. 3:1 or 4:1 produces more dimensional, slightly more dramatic results. Ratios above 4:1 produce moody, low-key looks with deep shadows.
Window light can serve as the key, but recreating a full three-point setup with only natural light is tricky. A common approach: use a window as the key, a reflector as the fill, and one added light as the back light. Pure natural light can look beautiful, but it takes careful planning around the sun's direction and the time of day.
For stylised content, like music videos, fashion, and narrative film, unconventional lighting often works better than standard three-point. The rules are a starting point, not a cage. Once you understand the principles behind them, like dimension, separation, and contrast control, you can adapt the three-light setup in all sorts of ways.